文档扫描OCR识别

文档扫描OCR识别

文档扫描

引入库

1
2
3
4
import imutils
import numpy as np
import argparse
import cv2

设置参数

1
2
3
4
5
# 设置参数
# 这里设置的参数是控制台参数
ap = argparse.ArgumentParser()
ap.add_argument("-i", "--image", required=True, help="Path to the image to be scanned")
args = vars(ap.parse_args())

定义函数

1
2
3
4
5
6
7
8
9
10
11
12
13
14
15
16
17
18
19
20
21
22
23
24
25
26
27
28
29
30
31
32
33
34
35
36
37
38
39
40
41
42
43
44
45
46
47
48
49
50
51
52
53
54
55
56
57
58
59
60
61
62
63
64
65
66
67
68
69
70
71
72
73
74
75
76
77
78
79
80
81
82
83
84
85
86
87
88
# 图像显示函数
def cv_show(name, img):
cv2.imshow(name, img)
cv2.waitKey(0)
cv2.destroyAllWindows()

# 图像大小重置 这里是等比例改变大小的,长度和宽度只需要写一个即可
# 参数1:需要改变大小的图像
# 参数2:改变的长度
# 参数3:改变的宽度
# 参数4:改变的方式
def resize(image, width=None, height=None, inter=cv2.INTER_AREA):
dim = None
# 先获取图像的长和宽
(h, w) = image.shape[:2]
# 如果没有设置改变后的长和宽的话,则直接返回这个图像
if width is None and height is None:
return image
# 判断一下改变后的长和宽,只取一个,按照等比例缩放
if width is None:
# 算出来比例
r = height / float(h)
# 获取对应比例的宽
dim = (int(w * r), height)
else:
# 算出来比例
r = width / float(w)
# 获取对应比例的高
dim = (width, int(h * r))
resized = cv2.resize(image, dim, interpolation=inter)
return resized


# 返回轮廓的坐标点
def order_point(pts):
# 一共四个坐标点
rect = np.zeros((4, 2), dtype="float32")

# 按照顺序找到对应的坐标0123 分别是左上,右上,右下,左下
# 计算左上,右下
s = pts.sum(axis=1)
rect[0] = pts[np.argmin(s)]
rect[2] = pts[np.argmax(s)]

# 计算右上,左下
diff = np.diff(pts, axis=1)
rect[1] = pts[np.argmin(diff)]
rect[3] = pts[np.argmax(diff)]

return rect


# 将图像拉伸成平面图,规范图像
def four_point_transform(image, pts):
# 获取输入的坐标点
rect = order_point(pts)
(tl, tr, br, bl) = rect

# 计算输入的w和h值
# 判断最大的宽和长,并以它们作为标准
# widthA 底部w
# widthB 顶部W
# 计算公式((x1 - x2)^2 + (y1 - y2)^2)^0.5
widthA = np.sqrt(((br[0] - bl[0]) ** 2) + ((br[1] - bl[1]) ** 2))
widthB = np.sqrt(((tr[0] - tl[0]) ** 2) + ((tr[1] - tl[1]) ** 2))
maxWidth = max(int(widthA), int(widthB))

heightA = np.sqrt(((tr[0] - br[0]) ** 2) + ((tr[1] - br[1]) ** 2))
heightB = np.sqrt(((tl[0] - bl[0]) ** 2) + ((tl[1] - bl[1]) ** 2))
maxHeight = max(int(heightA), int(heightB))

# 变换完之后的坐标为
dst = np.array([
[0, 0],
[maxWidth - 1, 0],
[maxWidth - 1, maxHeight - 1],
[0, maxHeight - 1]
], dtype="float32")

# 计算变化矩阵
# 两个参数,第一个是原始矩阵的坐标,第二个是目标矩阵的坐标
# 需要先将 二维不规则坐标转换为三维坐标,再由三维坐标转换为二维规则坐标
# 这里使用[x, y] -> [x, y, 1] 我们手动添加一个维度,为什么添加一,是为了保证数据不改变 [kx, ky, k]
M = cv2.getPerspectiveTransform(rect, dst)
warped = cv2.warpPerspective(image, M, (maxWidth, maxHeight))

# 返回变换后的结果
return warped

数据读入和处理

1
2
3
4
5
6
7
8
9
10
11
12
13
14
15
# 数据的读入
image = cv2.imread(args["image"])
# 获取坐标比例
ratio = image.shape[0] / 500.0
# 复制图像当做原始图像
orig = image.copy()

image = resize(orig, height=500)

# 预处理操作
gray = cv2.cvtColor(image, cv2.COLOR_BGR2GRAY)
gray = cv2.GaussianBlur(gray, (5, 5), 0)
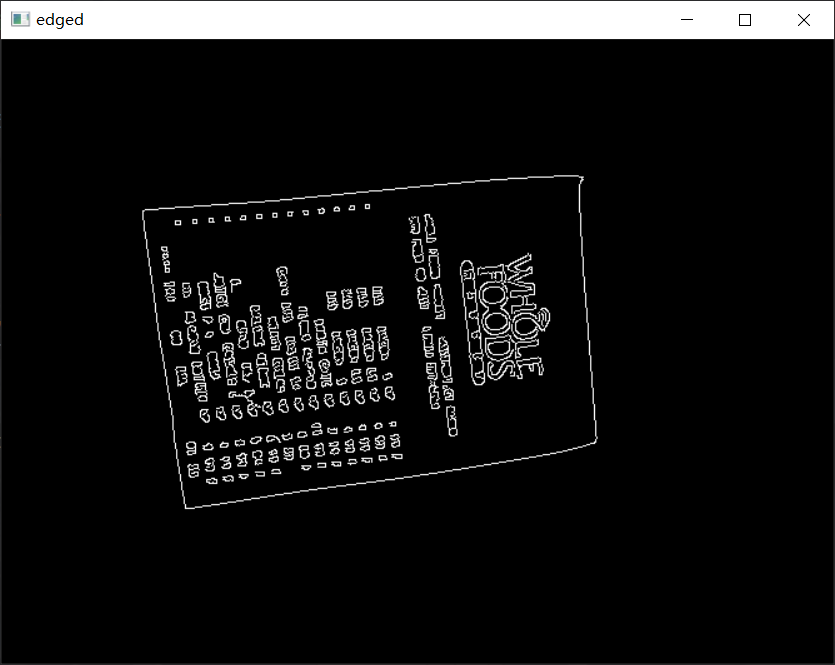
edged = cv2.Canny(gray, 80, 225)

cv_show("edged", edged)

image-20220705105828743

轮廓检测与遍历

1
2
3
4
5
6
7
8
9
10
11
12
13
14
15
16
17
18
19
20
21
22
23
24
# 轮廓检测
# findContours返回参数问题
# findContours在opencv3.4.3.18之后返回值都为两个,去掉了第一个返回值图像
cnts = cv2.findContours(edged.copy(), cv2.RETR_LIST, cv2.CHAIN_APPROX_SIMPLE)
cnts = cnts[1] if imutils.is_cv3() else cnts[0]
# 取前5个轮廓大的
cnts = sorted(cnts, key=cv2.contourArea, reverse=True)

# 遍历轮廓
for c in cnts:
# 计算轮廓的近似
peri = cv2.arcLength(c, True)
# c表示轮廓的点集
# epsilon 表示精度,就是近似的轮廓与原轮廓之间的距离,精度越小,越精致,精度越大,越标准
# closed表示 近似轮廓是否封闭
approx = cv2.approxPolyDP(curve=c, epsilon=0.02 * peri, closed=True)

# 如果是四个点的时候就把他拿出来,表明是一个矩形
if len(approx) == 4:
screenCnt = approx
break
# 展示结果
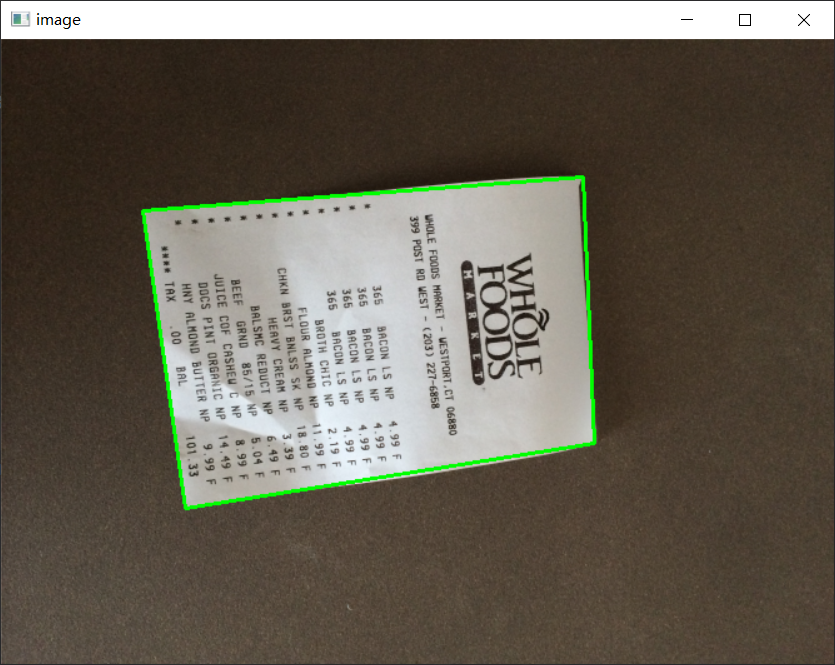
cv2.drawContours(image, [screenCnt], -1, (0, 255, 0), 2)
cv_show("image", image)

image-20220705105927687

透视变换并处理

1
2
3
4
5
6
7
8
9
10
11
12
13
# 透视变换
warped = four_point_transform(orig, screenCnt.reshape(4, 2) * ratio)

# 二值处理
warped = cv2.cvtColor(warped, cv2.COLOR_BGR2GRAY)
ref = cv2.threshold(warped, 100, 255, cv2.THRESH_BINARY)[1]
ref = resize(ref, height=650)

# 图像旋转
ref = cv2.rotate(ref, cv2.ROTATE_90_COUNTERCLOCKWISE)

# 写入图像 方便图像识别
cv2.imwrite("scan.jpg", ref)

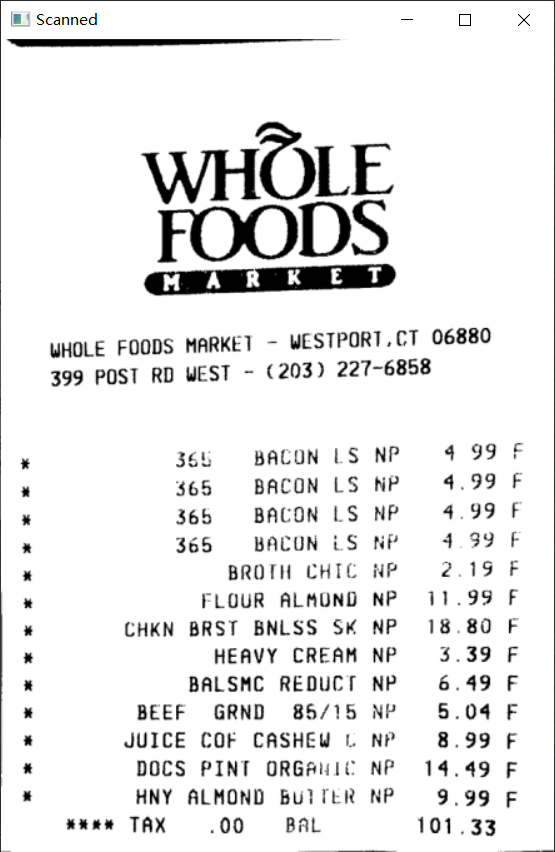
通过这种方法可以将图像拉伸成标注图像

image-20220705110510209

文字识别

这个文字识别是引用了tesseract库,这个库能够识别中英文,比较强大

先引入库

1
2
3
import pytesseract
import cv2
import os

图像读取和处理

1
2
3
4
5
6
7
8
9
10
11
12
13
14
# 图像读取
image = cv2.imread("E:\PythonProject\ComputerVision\OpenCvDocumentScan\scan.jpg")
# 图像长宽获取
(h, w) = image.shape[:2]
# 将图像调整为合适的大小
image = cv2.resize(image, (int(w * 0.5), int(h * 0.5)), interpolation=cv2.INTER_AREA)
# 进行灰度处理
gray = cv2.cvtColor(image, cv2.COLOR_BGR2GRAY)

# 比较一下二值化和滤波操作那个比较好
if preprocess == "thresh":
gray = cv2.threshold(gray, 0, 255, cv2.THRESH_BINARY | cv2.THRESH_OTSU)[1]
if preprocess == "blur":
gray = cv2.medianBlur(gray, 3)

文字识别

1
2
3
4
5
6
7
8
9
# 通过库来进行文字识别
text = pytesseract.image_to_string(image)
print(text)


cv2.imshow("Image", image)
cv2.imshow("Output", gray)
cv2.waitKey(0)
cv2.destroyAllWindows()

结果:

输出结果:

1
2
3
4
5
6
7
8
9
10
11
12
13
14
15
16
17
18
19
20
21
22
23
24
25
26
27
WHOLE
YGops

HOLE FOODS MARKET - WESTPORT, CT 06880
399 POST RD UEST - (203) 227-6858

BACON LS NP 4 99

BACON LS NP 4.99
BACON LS NP 4.99
ACUN LS NP

BROTH CHIC HP

FLOUR ALAUND NP

CHKN BRST BNLSS SK NP
HEAVY CREAM NP

BALSMC REDUCT NP

BEEF GRND 85/15 NP
JUICE COF CASHEY 1. NP
DOCS PINT ORGANIC NP
HNY ALMOND Bur TER NP

sume TAX 00 BAL